Agent DNA
Introduction
Agent DNA allows you to add agent profiles to your website. With Agent DNA, an agent can complete a simple online form and the system will automatically build a fully integrated, visually appealing agent bio for a single agent or for the entire agency. You can see an example of how the Agent Bios look on a site here. This guide will walk you through the steps to create profiles and display them on your site:
- Creating a profile
- Displaying an agent directory on your site
- Displaying a single agent profile on your site
Creating a Profile
There are two areas where agent profiles can be managed depending on your level of access: AgentPort or NexCite Website Tools/VacationPort Administration. Individual agents can create their profiles by logging into AgentPort. Agency managers/owners who have administration access can create and manage all agent profiles from the Travel Content area of NexCite Website Tools or VacationPort Administration. We'll go over how to create an agent profile within AgentPort first.
Creating an Agent Profile in AgentPort
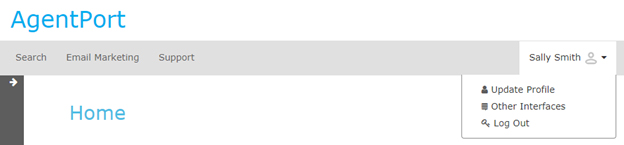
To create your own profile, login to AgentPort (for login assistance, click here), hover over your name in the upper right-hand corner, and click on Update Profile:
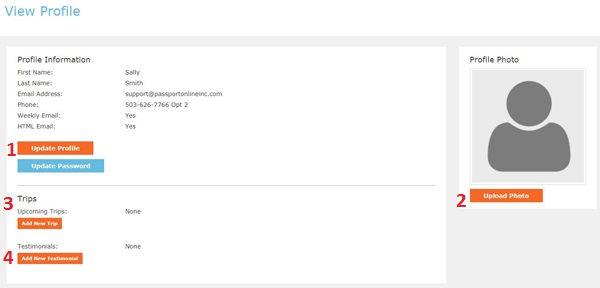
From your profile page, you'll be able to access the different components of your profile:
- First and Last Name: Enter your first and last name as you want them to be displayed.
- Email Address: This should be the email address you want your customers to use to contact you. All email addresses displayed are protected from being gathered by bots.
- Phone: This should be the phone number you want your customers to use to contact you. If you have an extension, be sure to note it here.
- Facebook URL: The URL for your personal Facebook page or individual Facebook business page. Make sure to include the entire URL, including the http:// portion.
- Twitter Username: The username for your Twitter account will be used to create a link to your Twitter account.
- Instagram Username: The username for your Instagram account will be used to create a link to your Instagram account.
- Personal Website URL: Make sure to include the entire URL, including the http:// portion.
- Specialty (Destinations): As you start typing in a destination, a dropdown box will display allowing you to select the destination. Not all destinations will display within the dropdown box. If the destination you are entering does not display, simply type in the destination and press enter.
- Specialty (Lifestyle/Style): As you start typing in a lifestyle/style, a dropdown box will display allowing you to select the lifestyle/style. (Examples include: Luxury, Honeymoons, Family)
- Specialty (Travel Types): A dropdown will display to allow you to select the travel types that you specialize in.
- Biography: Your biography will be used for display within the Agent Directory (the first 149 characters) and on your Agent DNA profile page. Your biography is limited to a total of 50,000 characters. You can find some ideas and suggestions for your biography here.
- Certifications: Certifications can include supplier, destination and industry certifications.
- Languages Spoken: As you start typing a dropdown box will display allowing you to select a language. Not all languages will display within the dropdown box so keep typing in the language and press enter.
- Where I’ve Traveled: As you start typing in a destination a dropdown box will display allowing you to select the destination. Not all destinations will display within the dropdown box so keep. typing in the destination and press enter.
- Profile Photo
-
Upcoming Trips
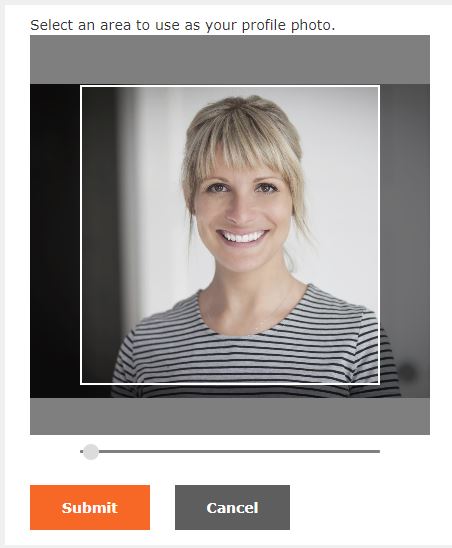
You can upload an image to your profile from your computer by selecting the Upload Photo button. The profile photo tool will automatically crop your image to be the same size and ratio for consistency. You will be able to move your photo around the crop area by dragging and dropping your image, and can adjust the zoom on your image using the slider below:
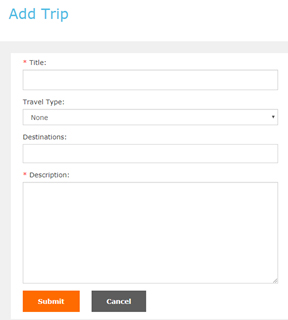
You can add your upcoming trips by clicking on the Add New Trip button. You can also manage previous trips you have created by clicking on the Edit or Delete buttons for any trip.

The following screen will display after you click on Add New Trip.
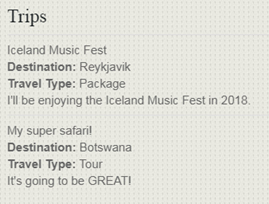
All Upcoming Trips that you have entered will display within your Agent DNA profile page. Below is an example of how upcoming trips will display on your Agent DNA profile page.
Upcoming Trips Profile Fields
- Title: The title of the trip. This will display to your customers. This field is required.
- Travel Type: Select the type of travel from the dropdown list.
- Destinations: You can enter one, or more, destinations in this field. As you start typing in a destination a dropdown box will display allowing you to select the destination. Not all destinations will display within the dropdown box so keep typing in the destination and press enter.
- Description: A description of your upcoming trip. This is a good place to call out any highlights that would be interesting to your customers. Each description is limited to 5,000 characters. This field is required.
4. Testimonials
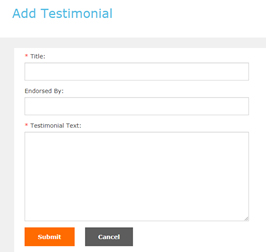
You can add your testimonials by clicking on the Add New Testimonial button. You can also manage previous trips you have created by clicking on the Edit or Delete buttons for any testimonial.

The following screen will display after you click on Add New Testimonial:
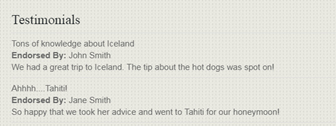
All testimonials that you have entered will display on your Agent DNA profile page. Testimonials can also be included in other areas of your site. Below is an example of how testimonials will display on your Agent DNA profile page:
Testimonials Profile Fields
- Title: The title of the testimonial. This will display to your customers. This field is required.
- Endorsed By: The name of the person providing the testimonial. This will display to your customers.
- Testimonial Text: The actual testimonial of your agency/service. Each testimonial text is limited to 5,000 characters. This field is required.
Ideas for creating your biography
If you are having trouble creating your biography, here are some questions you can answer to get started.
Years in Business:
Number of Cruises Taken:
Number of Continents Visited:
Number of Countries Visited:
Favorite Destination:
Favorite Type of Travel:
Favorite Part of My Workday:
Why I got into the Travel Business:
Creating a profile within NexCite or VacationPort
To add a profile for yourself or one of your agents, login to your NexCite Website Tools or VacationPort Administration, click on Travel Content, then click on Your Agents. Scroll down to the agent that you want to create a profile for and click on Advanced Profile. You will complete the information described above.

Displaying An Agent Directory on Your Site
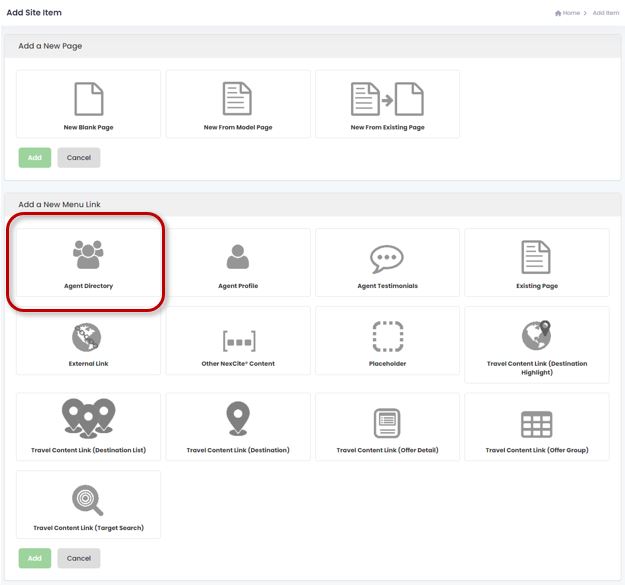
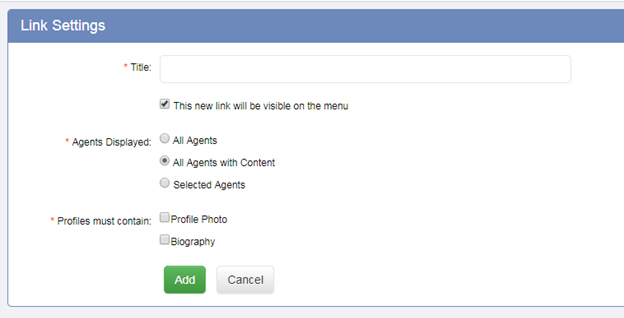
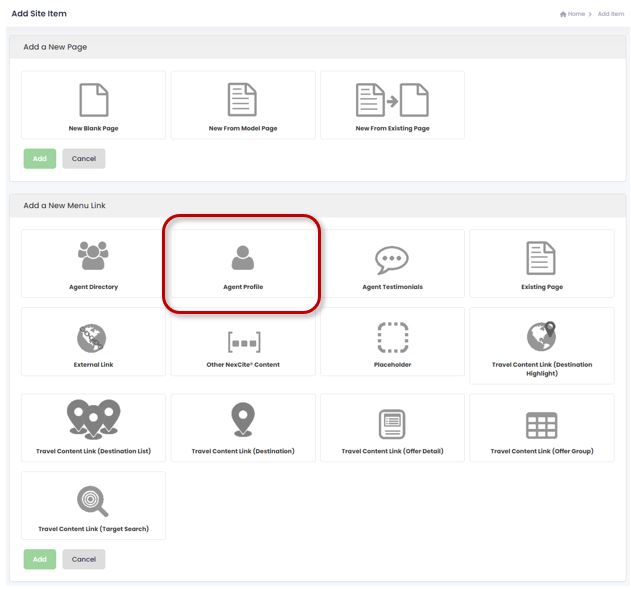
To display the agent directory on your site, log in to your NexCite Website Tools or VacationPort Administration tools. On your Page Admin tab, click on Add Item, and then choose the Agent Directory option.
You will be able to choose which agent’s profiles you want to display on your site:

Choosing which Agents display in the Agent Directory
You have three options to control which agents display within your Agent Directory.
- All Agents: This option will display every agent at the agency that has an AgentPort account. The agents will display even if they have not filled out their profile.
- All Agents with Content: This option will display every agent at the agency that has an AgentPort account and the have filled out the sections of their profile that you select. There are two additional options available. You can choose to display only profiles containing both, or one or the other of these sections. For example, if you select both Profile Photo and Biography any agents that have not added a profile photo and filled out their biography will not be displayed.
- Profile Photo
- Biography
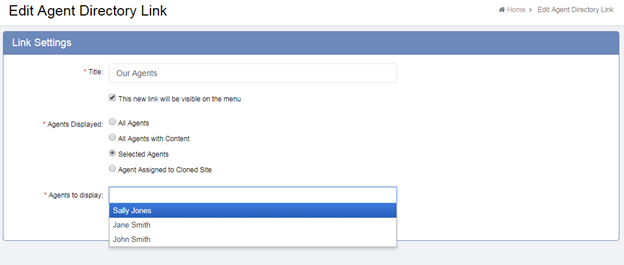
- Selected Agents: This option will display only the agents that you select from the dropdown list of agents at your agency with an AgentPort account. The agents will display even if they have not filled out their profile.
All Agents with Content option:
Select Agents option:
Displaying a Single Agent Profile on Your Site
To display a single agent profile on your site, log in to your NexCite Website Tools or VacationPort Administration tools. On your Page Admin tab, click on Add Item, and then choose the Agent Profile option:
Then, add your desired title for the page and select which specific agent proilfe you want to use for your page:
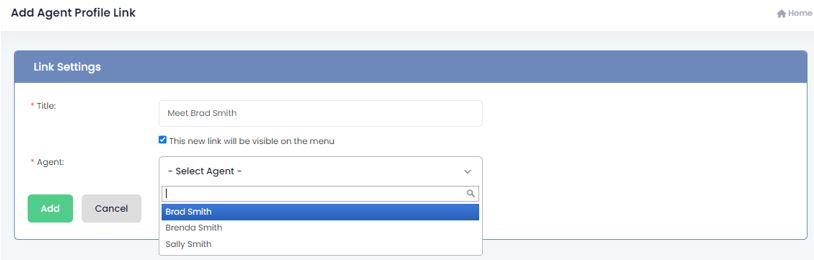
In this example, we've selected Brad Smith. To see what this looks like on a site click here.